
User Tag List
 Thanks: 0
 Likes: 0
Results 1 to 10 of 21
Thread: Dang!
-
07-02-2016, 11:48 AM #1Long Hauler


- Join Date
- Dec 2014
- Location
- Carlsbad, CA
- Posts
- 2,959
- Mentioned
- 10 Post(s)
- Tagged
- 3 Thread(s)
Dang!
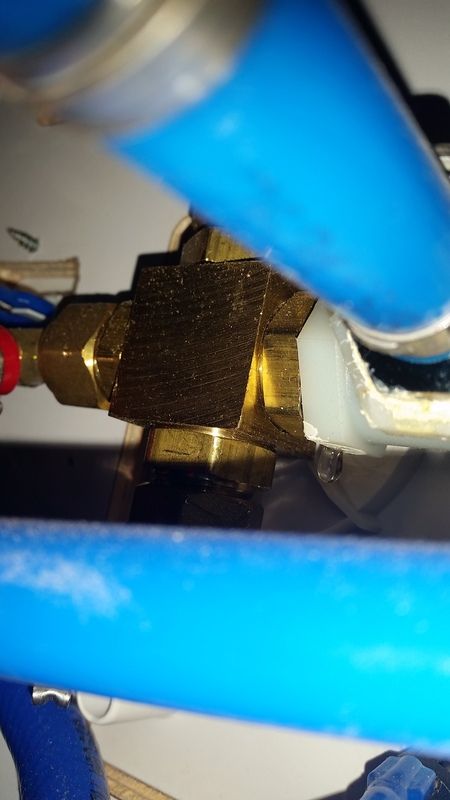
Well, we just got back from the week camping in the mountains. While we were there I noticed some water trickling on to the ground under the trailer where the water hose enters. I checked it a couple times and kept feeling like it was just leaking where my hose connects and decided I needed to replace my brass elbow, I keep attached to the Kantleak panel, when I got home. So today I decided to explore it more and, sure enough, after 1 1/2 years the damn plastic "T" behind the panel is dripping. Dang, I was hoping I would be one of the lucky ones who would go through years without a leak. Guess not. Now I am printing our Rob's repair guide and I'll get it fixed.
Not whining but it's not going to be easy in there with my bum shoulder but I've got to get it done so I can focus on my solar install that is still waiting for me to recover.
 Paul "Poppy" and Deb Cervone
2022 Imagine XLS 22MLE
2021 Imagine XLS 17MKE - SOLD ; 2015 Grand Design Reflection 337RLS - SOLD
2016 GMC Denali 3500HD SRW Duramax/Allison CC 4x4; Tire Minder TPMS
-
07-02-2016, 12:01 PM #2Site Sponsor


- Join Date
- Jul 2014
- Posts
- 8,880
- Mentioned
- 85 Post(s)
- Tagged
- 0 Thread(s)
Hey Paul,
That is the "classic" Kantleak leak location. I would be surprised if any of them last forever without developing this leak.
Hopefully the repair won't be too tough on your shoulder. Most of the job can be done sitting upright on a chair in front of the panel.
Taking the faceplate off before trying to undo the water connections is the key.
Goodluck!
RobCate & Rob
2015 Reflection 303RLS
-
07-02-2016, 12:19 PM #3Long Hauler
- Join Date
- Dec 2014
- Location
- Carlsbad, CA
- Posts
- 2,959
- Mentioned
- 10 Post(s)
- Tagged
- 3 Thread(s)
Thanks Rob. I'm heading out to take it apart now that I've printed out your instructions. Originally Posted by Cate&Rob

You're the best!!Paul "Poppy" and Deb Cervone
2022 Imagine XLS 22MLE
2021 Imagine XLS 17MKE - SOLD ; 2015 Grand Design Reflection 337RLS - SOLD
2016 GMC Denali 3500HD SRW Duramax/Allison CC 4x4; Tire Minder TPMS
-
07-02-2016, 01:37 PM #4Long Hauler
- Join Date
- Dec 2014
- Location
- Carlsbad, CA
- Posts
- 2,959
- Mentioned
- 10 Post(s)
- Tagged
- 3 Thread(s)
So Rob, I've got it all apart, although mine is different from yours in a few ways. In the end we are still left with a plastic (the Kantleak valve) connecting to the new brass T. I guess if there's a question here it would be what makes us think that union will last either? All we're doing is going from two (2) plastic to brass unions to one (1). Correct?
Also, once you setup the new brass T with the sharkbite connector and then cut off the end of the blue pex, was it long enough? My blue pex comes off a T and is only 2 1/2 inches long. By the time I cut off a tad over 1/4 inch, it's going to be a tight stretch getting it into the sharkbite fitting with the other pressures on the entire line. I'm worried about it pulling out.
Thoughts as I head of to Home Depot?Paul "Poppy" and Deb Cervone
2022 Imagine XLS 22MLE
2021 Imagine XLS 17MKE - SOLD ; 2015 Grand Design Reflection 337RLS - SOLD
2016 GMC Denali 3500HD SRW Duramax/Allison CC 4x4; Tire Minder TPMS
-
07-02-2016, 03:43 PM #5Site Sponsor
- Join Date
- Jul 2014
- Posts
- 8,880
- Mentioned
- 85 Post(s)
- Tagged
- 0 Thread(s)
Hi Paul,
Agreed that there is still a plastic to brass interface between the Kantleak valve body and the new brass T. But, the interface has been reversed with the male part being plastic and the female part being brass. The failures have always been male brass to female plastic. Don't know if this is going to make a difference, but so far so good for everyone who has installed a brass T. I think a generous application of pipe thread sealer (rather than teflon tape) allows for some "flow" of sealer if necessary to seal a future leak.
The shark bite fitting sticks out a little further from the T than the original Pex crimp plastic connector and needs only 1/2" insertion. I was able to cut off about 3/8" to clean up the end of the Pex and still end up with with original position for the blue Pex line going into the shark bite.
RobCate & Rob
2015 Reflection 303RLS
-
07-02-2016, 04:15 PM #6Seasoned Camper

- Join Date
- Mar 2015
- Posts
- 165
- Mentioned
- 0 Post(s)
- Tagged
- 0 Thread(s)
Could someone please post the leak to the repair? Haven't had the issue yet but would like to review it and get the parts so I have them. Thank you.
-
07-02-2016, 04:46 PM #7Site Sponsor
- Join Date
- Jul 2014
- Posts
- 8,880
- Mentioned
- 85 Post(s)
- Tagged
- 0 Thread(s)
dihtn1, Originally Posted by dihtn1
This is the repair process that has been attached to and discussed in several different threads . . .
RobCate & Rob
2015 Reflection 303RLS
-
07-02-2016, 05:16 PM #8Long Hauler
- Join Date
- Dec 2014
- Location
- Carlsbad, CA
- Posts
- 2,959
- Mentioned
- 10 Post(s)
- Tagged
- 3 Thread(s)
Man, no luck at Home Depot on the brass T so 10 miles away is a Lowe's and thankfully they had what I needed. Too late to finish now, it's beer time! I'll get it finished up tomorrow.
Paul "Poppy" and Deb Cervone
2022 Imagine XLS 22MLE
2021 Imagine XLS 17MKE - SOLD ; 2015 Grand Design Reflection 337RLS - SOLD
2016 GMC Denali 3500HD SRW Duramax/Allison CC 4x4; Tire Minder TPMS
-
07-03-2016, 07:43 AM #9Left The Driveway
- Join Date
- Jun 2016
- Location
- Orland Park ILL
- Posts
- 10
- Mentioned
- 0 Post(s)
- Tagged
- 0 Thread(s)
Hope things go well with your repair and I also noticed your water leak detectors. I did not think of that but I like it. If you dont mind I am going to look into that. I just have to decide on proper location. Best of luck.
-
07-03-2016, 08:13 AM #10Site Sponsor
- Join Date
- Jul 2014
- Posts
- 8,880
- Mentioned
- 85 Post(s)
- Tagged
- 0 Thread(s)
I ran one sensor cable down into the underbelly and the other sensor cable under the Kantleak panel and around the base of the water pump. The only problem that I have encountered is that there is no sensitivity adjustment. A few drops of water or condensation sets off the alarm the same as a significant leak/spill. (This led to an easily opened door in the pass through wall so that I can quickly check on what the problem might be). Originally Posted by maddog1800
The units shown in the previous attachment are powered by 9V batteries. I wanted mine powered by the main 12V battery. Primarily so that when I shut off the main battery switch, the water sensors turn off. (No point in an alarm go off if I am not there to solve it). So, I found DC voltage stepping circuits that fit in the alarm battery compartments and step the 12V supply down to the 9V required by the water alarms.
http://store.qkits.com/power-supplie...or-5-amps.html
RobCate & Rob
2015 Reflection 303RLS


 Reply With Quote
Similar Threads
-
Dang! Broken Wheel
By Paul & Deb in forum General DiscussionReplies: 16Last Post: 07-28-2017, 10:11 PM -
Dang! And it wasn't even my fault.....
By nguyenbio in forum General DiscussionReplies: 4Last Post: 09-19-2014, 10:32 AM


310GK Bounce When Towing
Today, 07:39 AM in Fifth Wheel Hitching Topics